Unlock Claude Code Plugins Before Everyone Else Does

Look, if you’ve ever copied the same code snippet across multiple projects, or spent an hour explaining your team’s workflow to a new developer for the hundredth time, you’re going to love what Anthropic just rolled out.
Claude Code Plugins are now in public beta, and honestly? They’re kind of brilliant in their simplicity.
Here’s the basic idea… all those custom commands, specialized AI agents, and tool connections you’ve been building?
You can now bundle them up and share them with your team or the entire world with literally one command.
No more “hey, can you send me that YAML file again?”
No more teammates reinventing wheels you already built.
Just clean, shareable packages that install instantly and update automatically.
Let me walk you through everything you need to know.
- What is Claude Code Plugins?
- What Even Are Claude Code Plugins?
- Why Should You Actually Care About This?
- How Do I Actually Use Plugins?
- How to Manage Your Plugins?
- Understanding Plugin Marketplaces
- Slash Commands: Your Personal Shortcuts
- Subagents: Specialized Helpers
- Hooks: Customizing When Things Happen
- Creating Your Own Plugin (Let's Build Something)
- Setting Up Your Plugin Project
- Publishing Your Plugin to GitHub
- Adding More Advanced Stuff
- Real Ways Teams Are Using This
- Your Turn: What Should You Build?
- Getting Started Right Now
What is Claude Code Plugins?
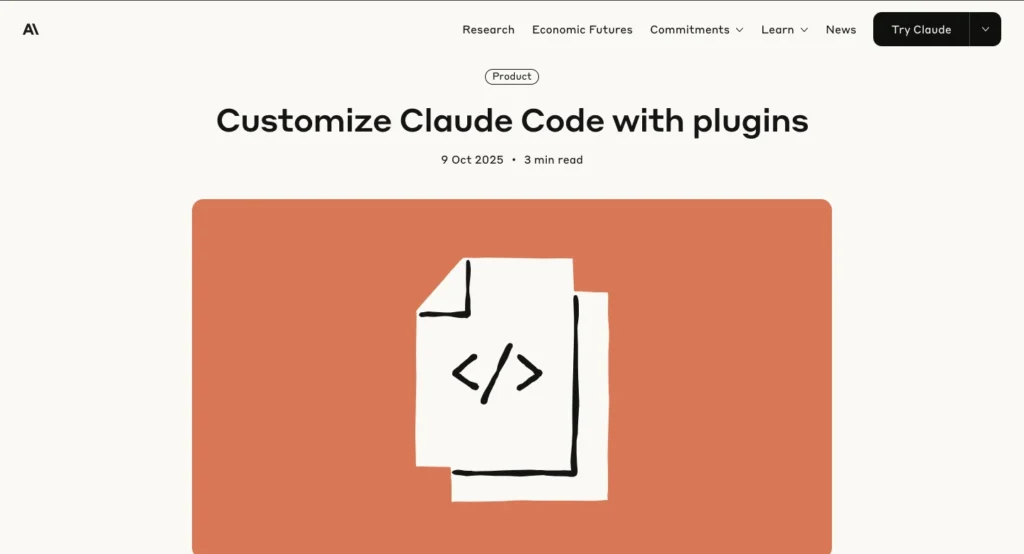
What Even Are Claude Code Plugins?
In simple words, think of plugins as smart bundles.
They package up four types of things you might want to share:
Slash commands are your custom shortcuts. Instead of typing out “analyze this code for security vulnerabilities, check for SQL injection, validate input sanitization, and suggest fixes” every single time, you just type /security-check.
Done.
Subagents are specialized AI assistants. While Claude handles general coding stuff, these agents focus on specific tasks, like security reviews, documentation, or testing.
They’re basically expert team members you can spin up whenever you need them.
MCP servers connect Claude to external tools. Want Claude to search your Slack messages, update Jira tickets, or grab files from Google Drive?
MCP servers make that happen without you writing a single line of integration code.
Hooks let you customize what happens at key moments in your workflow. Want to play a sound when a task finishes? Send yourself a notification? Run automatic checks before every commit? That’s what hooks do.
The genius part? All of this installs with a single command. Your teammate doesn’t need to configure anything, copy files around, or follow a 20-step setup guide.
They just run /plugin install your-plugin-name and boom, they’ve got everything you’ve got.
Why Should You Actually Care About This?
Here’s the thing, most developer tools either give you zero flexibility or overwhelm you with a million options.
Claude code plugins hit a sweet spot in the middle.
The Discoverability Problem
Right now, someone on your team probably built something awesome. Maybe it’s a command that generates perfect pull request descriptions.
Maybe it’s an agent that catches security issues before they hit production. But does anyone else know it exists? Probably not.
They’re using their magic trick every day while you’re doing things the hard way, simply because you don’t know their tool exists.
Plugins solve this. Browse a marketplace, see what’s available, install what you need. No more hidden gems gathering dust on someone’s local machine.
The Portability Nightmare
Ever tried to replicate someone’s development setup? It’s a nightmare.
“Oh yeah, you need to install this thing, then configure that file, and make sure you set these three environment variables, wait, which shell are you using again?”
Plugins handle all of that.
When you install a plugin, you get everything configured correctly, with all dependencies sorted out. What works on one machine works on every machine.
Real Customization (Not Fake Customization)
A lot of tools claim to be “customizable” but really just mean you can change some colors or rearrange some buttons. With plugins, you’re actually building new capabilities.
You’re teaching Claude Code to work exactly how your team works.
Want a command that generates code following your company’s specific style guide? Build it. Need an agent that understands your internal API documentation?
Create it. Have weird legacy tools that only your company uses? Connect them through MCP servers.
This is real customization. You’re not picking from a menu of pre-approved options, you’re creating entirely new functionality.
How Do I Actually Use Plugins?
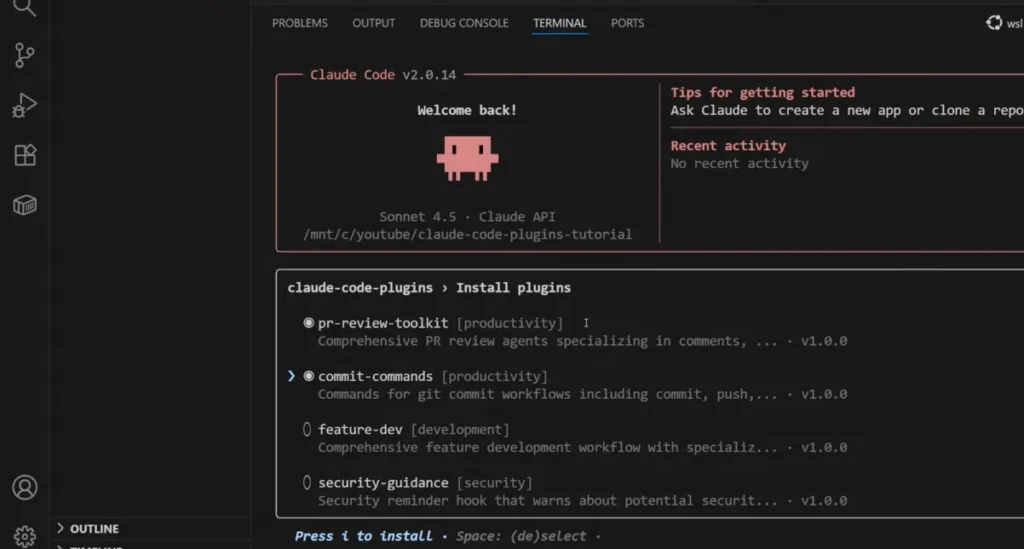
Let’s get practical. I’m going to show you how to install your first plugin right now.
What You Need Before Starting
Not much, honestly:
- Node.js 18 or newer (you probably already have this)
- A Claude account or Console console account (the free one works fine)
- Claude Code installed on your machine
If you haven’t installed Claude Code yet, it’s literally three commands:
npm install -g @anthropic-ai/claude-code
cd your-project-folder
claude
You’ll log in the first time, and you’re good to go.
Installing Your First Plugin (Takes 2 Minutes)
Alright, open up Claude Code. Let me show you how easy this is.
Step 1: Add a marketplace
Type `/plugin` and hit Enter. You’ll see a menu. Choose “Add marketplace.”
Now you need a marketplace URL.
Anthropic runs an official one with example plugins. To add it, type:
anthropics/claude-codeThat’s it. Claude Code goes and fetches the marketplace catalog.
Step 2: Browse what’s available
Type `/plugin` again and choose “Browse and install plugins.”
You’ll see a list of available plugins. Use your arrow keys to move around. Each plugin has a description telling you what it does. For your first try, maybe install the “PR Review” plugin, it helps with code reviews.
Press the spacebar to select plugins you want. You can select multiple at once if you’re feeling adventurous.
Step 3: Install
Press `i` to install everything you selected. Claude Code downloads and sets everything up.
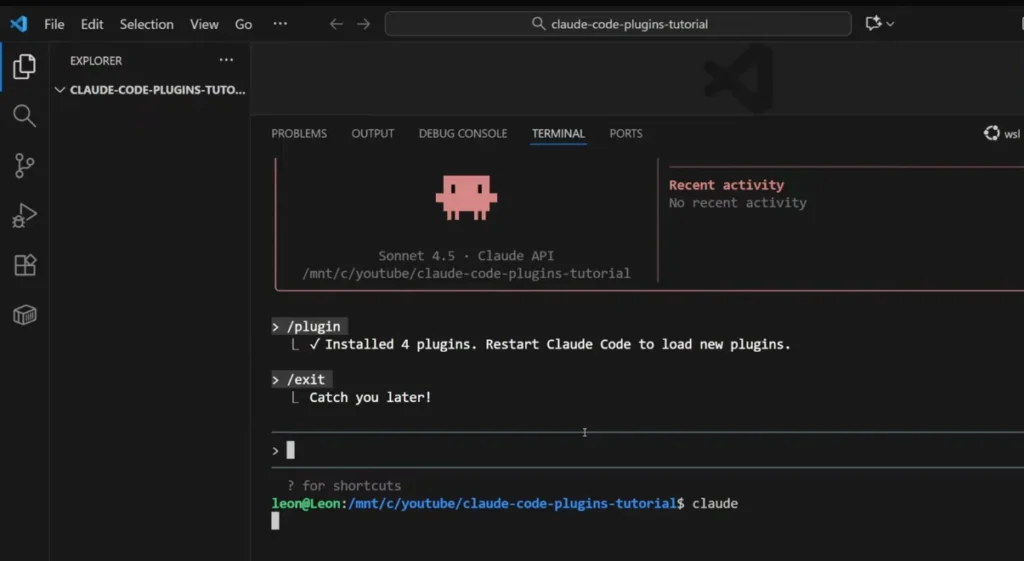
Step 4: Restart and use
Exit Claude Code (usually Ctrl+C or type `exit`) and start it again. Now your plugins are active.
Want to see your new commands? Press `/` and start typing. Want to use those new agents? Click the agent menu and look at what’s available.
That’s genuinely all there is to it. No configuration files. No manual setup. Just works.
Example of Plugin: https://github.com/anthropics/claude-code
How to Manage Your Plugins?
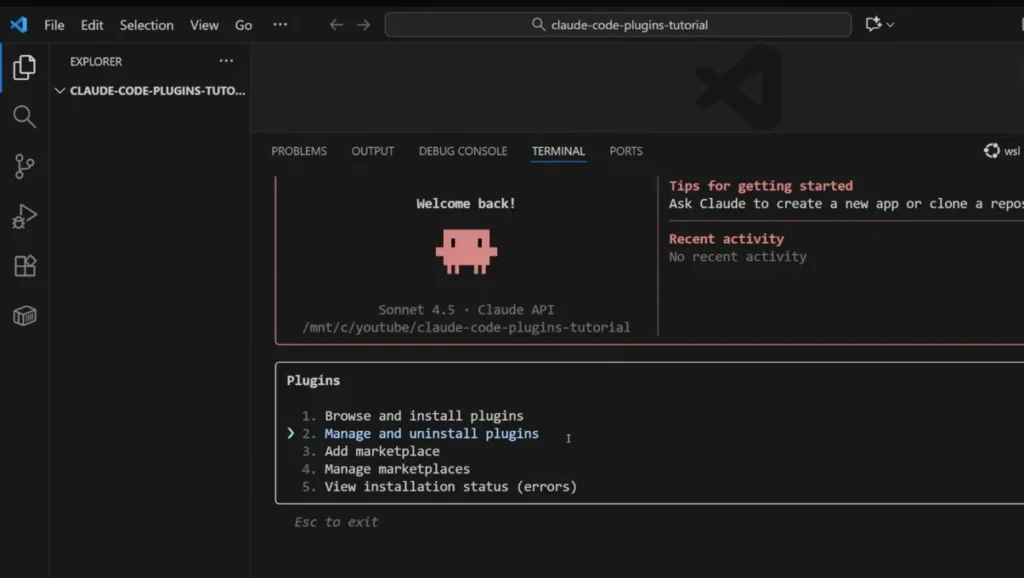
As you install more plugins, you’ll want to manage them.
Type `/plugin` and choose “Manage and uninstall plugins.”
Here you can see everything you’ve installed. You can disable plugins you’re not using right now (they stay installed but don’t load).
You can also completely uninstall ones you don’t want anymore.
Why would you disable instead of uninstall? Well, plugins take up space in Claude’s context window.
If you’re working on a web project, you probably don’t need your machine learning plugins loaded.
Disable them temporarily, turn them back on when you need them.
Understanding Plugin Marketplaces
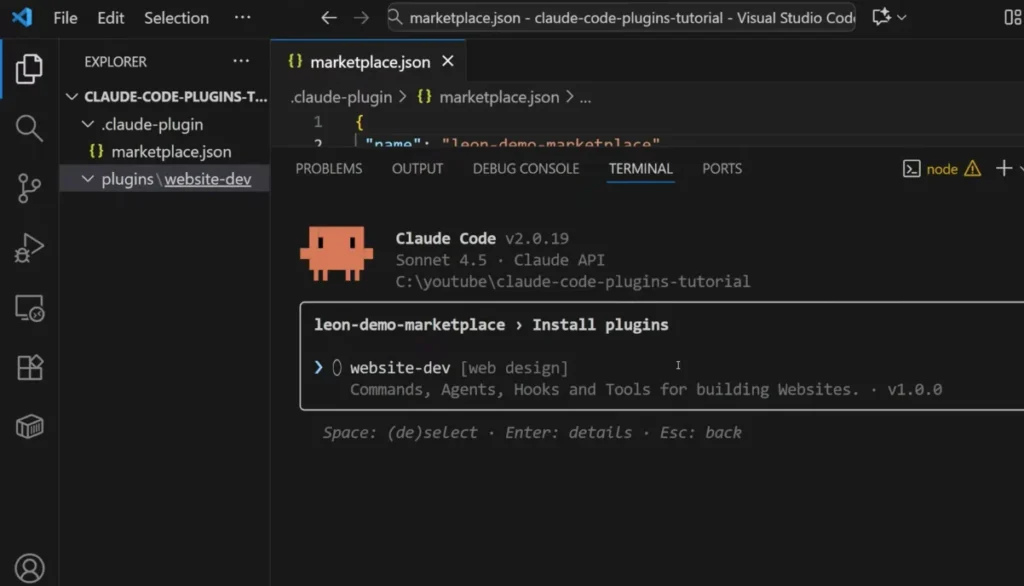
So where do these plugins actually come from? Marketplaces.
A marketplace is just a curated collection of plugins. Think of it like an app store, except way simpler. Anyone can create one, you just need a GitHub repository with a special file in it.
Anthropic runs the official marketplace with examples and production-ready plugins. Community members create their own marketplaces focused on specific things. For instance:
- Dan Ávila has a marketplace with DevOps automation tools
- Seth Hobson curated over 80 specialized agents for different tasks
- Framework authors create marketplaces with tools specific to their frameworks
You’re not limited to one marketplace either. Add as many as you want:
/plugin marketplace add anthropics/claude-code
/plugin marketplace add some-developer/cool-plugins
/plugin marketplace add your-company/internal-tools
Each marketplace stays independent, but you manage all your installed plugins in one place.
Private Marketplaces for Companies
Here’s something cool, companies can create private marketplaces visible only to their employees.
Your IT team sets one up with approved plugins that meet security requirements.
Developers install from that marketplace and get all the company-specific tools they need, pre-configured and ready to go.
No more onboarding docs that go stale.
No more “check with Sarah, she knows how to set this up.” Everyone installs from the company marketplace and they’re immediately productive.
Let’s talk about what actually goes into a plugin. Remember those four types I mentioned earlier? Let’s dig into each one.
Slash Commands: Your Personal Shortcuts
Commands are basically prompt templates with shortcut names attached. Instead of typing the same long prompt every time, you save it as a command and invoke it with a slash.
Here’s a real example.
Maybe you often need to add TypeScript types to JavaScript code.
You could type out “please convert this JavaScript to TypeScript, add proper type annotations, create interfaces for complex objects, and ensure type safety” every single time.
Or you could save that as a command called `convert-to-typescript` and just type `/convert-to-typescript`.
Commands live in simple markdown files. You give them a description (so people know what they do) and the actual prompt Claude should run. That’s it.
The beauty of commands is they make your common tasks instant. No more retyping. No more forgetting exactly how you phrased something last time.
Just consistent, fast shortcuts.
Subagents: Specialized Helpers
Subagents are where things get interesting. These are focused AI instances that handle specific tasks really well.
Why would you want separate agents instead of just using Claude for everything? Two big reasons.
First, they can work in parallel. Imagine you’re analyzing a large codebase.
The main Claude could spin up three subagents, one searching for security issues, one checking documentation quality, one analyzing performance.
They all work at the same time and report back with their findings.
Second, they manage context better. Subagents have their own context windows. They can process tons of information and return just the relevant bits to the main Claude.
This prevents your main context from getting cluttered with details you don’t need.
A subagent definition is also just a markdown file. You give it a name, description, specify which model it should use, and write instructions for its specific role.
For example, you might create a “documentation writer” subagent. Its entire job is analyzing code and generating clear documentation. It’s not trying to write code or fix bugs, just documentation. Being focused makes it really good at that one thing.
Hooks: Customizing When Things Happen
Hooks are event listeners for your development workflow. They let you say “when this specific thing happens, do that specific action.”
Common examples:
- Before committing code, run a formatter to ensure consistent style
- After Claude finishes a task, play a sound so you know it’s done
- When an error occurs, send yourself a notification
- During code review, automatically check a security checklist
Hooks are powerful because they automate the stuff you’d otherwise forget.
You don’t have to remember to run the formatter, it just happens. You don’t have to manually check the security list, it’s automatic.
A hook configuration just specifies when it runs and what command to execute. Pretty simple, but the impact can be huge.
Creating Your Own Plugin (Let’s Build Something)
Reading about plugins is one thing. Actually making one is way more fun. Let’s build a simple plugin together right now.
Setting Up Your Plugin Project
Create a new folder somewhere on your computer. Call it whatever you want, maybe `my-first-plugin`.
Inside that folder, you need two subfolders:
my-first-plugin/
├── .claude-plugin/
└── plugins/
The .claude-plugin folder will hold your marketplace configuration. The plugins folder will hold your actual plugins.
Creating the Marketplace File
Inside .claude-plugin, create a file called marketplace.json. This file tells Claude Code “hey, this is a marketplace with plugins in it.”
Here’s what goes in that file:
{
  "name": "my-dev-tools",
  "owner": {
    "name": "Your Name",
    "email": "you@example.com"
  },
  "metadata": {
    "description": "My personal development tools",
    "version": "1.0.0"
  },
  "plugins": [
    {
      "name": "quick-helpers",
      "path": "plugins/quick-helpers",
      "description": "Handy commands for everyday coding",
      "version": "1.0.0"
    }
  ]
}
Just fill in your actual name and email. The `plugins` array lists every plugin in your marketplace. Right now we’re just adding one called “quick-helpers.”
One important thing, see that `name` field that says “quick-helpers”? Keep that exact name in mind.
We’ll need to use it again in a minute, and it has to match exactly. Also, use hyphens, not spaces or underscores.
Creating Your First Plugin Inside the `plugins` folder, create another folder called `quick-helpers`.
Inside that, create another `.claude-plugin` folder, and inside that, create `plugin.json`:
my-first-plugin/
├── .claude-plugin/
│   └── marketplace.json
└── plugins/
    └── quick-helpers/
        └── .claude-plugin/
            └── plugin.json
In plugin.json, put:
{
  "name": "quick-helpers",
  "description": "Handy commands for everyday coding",
  "version": "1.0.0",
  "author": {
    "name": "Your Name",
    "email": "you@example.com"
  }
}
See how the name matches? “quick-helpers” in both files. This is super important. If they don’t match exactly, the plugin won’t install.
Adding Your First Command
Inside the quick-helpers folder, create a commands folder. Inside that, create a file called add-comments.md.
Here’s what goes in that file:
# Description
Add helpful comments to selected code

# Prompt
Please add clear, concise comments to the selected code explaining:
- What each major section does
- Why non-obvious decisions were made
- Any potential gotchas or edge cases

Keep comments professional and helpful, not obvious or redundant.
That’s it. You just created a command. When someone types /add-comments, Claude will run that prompt on their selected code.
Want to add more commands? Just create more markdown files in the commands folder. Each one becomes a new slash command.
Testing Locally Before Publishing
Here’s the cool part, you can test your plugin right now without publishing it anywhere.
Open Claude Code in your my-first-plugin folder. Type /plugin and choose “Add marketplace.”
When it asks for the marketplace URL, just type ./ (that’s dot-slash). This tells Claude Code “use the marketplace in this current folder.”
Claude Code will load your marketplace. You’ll see your “quick-helpers” plugin listed. Select it, install it, restart Claude Code.
Now type /add and you should see your new command appear. Select some code, run the command, and watch it work.
If something’s wrong, maybe the command doesn’t appear, or you get an error, check these common issues:
- Did the names match exactly in both JSON files?
- Did you spell “commands” correctly (not “command”)?
- Is your markdown file actually saved?
- Did you restart Claude Code after installing?
Once it works locally, you’re ready to share it with the world.
Publishing Your Plugin to GitHub
Alright, your plugin works. Now let’s get it on GitHub so other people can use it.
Getting It Into Git
If you’re comfortable with Git, this is straightforward. In your plugin folder:
git init
git add .
git commit -m "Initial plugin release"
If you’re using VS Code or another IDE, there’s usually a “Initialize Repository” button that does the same thing. Click it, then commit your files.
Pushing to GitHub
This part depends on your setup, but the general process:
First, create a new repository on GitHub. Name it something descriptive like “claude-dev-tools”.
Second, choose “Public” so others can access it.
Third, connect your local folder to that repository.
Fourth, push your code up.
If you’re using VS Code, there’s usually a “Publish to GitHub” button that handles all of this for you. Click it, name your repository, choose public, done.
Sharing Your Marketplace
Once it’s on GitHub, anyone can install from your marketplace. They just need your username and repository name.
If your GitHub username is “janedoe” and you named the repository “claude-dev-tools”, people install it with:
/plugin marketplace add janedoe/claude-dev-toolsThat’s it. They can now browse your plugins and install whatever they want.
Updating Your Plugins
Here’s something really cool, when you update your plugins, users automatically get those updates.
Say you want to add a new command or fix a bug in an existing one. Just make your changes, commit them, and push to GitHub:
git add .
git commit -m "Added new documentation command"
git push
Next time your users restart Claude Code, it pulls the latest version from your repository. They don’t reinstall anything. They don’t do anything. It just works.
This automatic updating is honestly one of the best parts of the whole system. No distribution headaches.
No “make sure you’re running version 2.3.5” confusion. Everyone’s always on the latest version.
Read This: https://docs.claude.com/en/docs/claude-code/plugin-marketplaces
Adding More Advanced Stuff
Once you’ve got basic commands working, you can add more sophisticated features.
Creating a Subagent
In your quick-helpers folder, create an agents folder. Inside that, create code-reviewer.md:
# Name
code-reviewer

# Description
Reviews code for common issues and suggests improvements

# Model
claude-sonnet-4
Your job is to review code and provide helpful feedback.
Focus on:
- Logic errors and potential bugs
- Code clarity and readability
- Performance concerns
- Security issues
- Best practices for the language being used
Be constructive. Explain why something might be problematic and suggest specific improvements.
Don’t just say “this is bad”, explain what would be better and why.
That creates a specialized agent. After restarting Claude Code, you’ll see “code-reviewer” in your agent menu. When you invoke it, it follows those instructions and only focuses on code review.
Adding an MCP Server
If you want to connect external tools, create a .mcp.json file in your quick-helpers folder:
{
  "mcpServers": {
    "slack-connector": {
      "command": "npx",
      "args": ["-y", "@slack/mcp-server"],
      "env": {
        "SLACK_TOKEN": "${SLACK_TOKEN}"
      }
    }
  }
}
This connects a Slack MCP server. Users need to set their SLACK_TOKEN environment variable, but once they do, Claude can search Slack messages, send messages, and interact with Slack directly.
The pattern is the same for any MCP server, you just specify how to start the server and what environment variables it needs.
Adding Hooks
Create a hooks folder in your plugin, and inside it create hooks.json:
{
  "hooks": {
    "post-completion": [
      {
        "name": "celebrate",
        "command": "echo '✓ Task complete!'",
        "description": "Shows completion message"
      }
    ]
  }
}
This simple hook just prints a checkmark when tasks finish. But you could make it play a sound, send a notification, log to a file, trigger a build, whatever makes sense for your workflow.
Real Ways Teams Are Using This
Let me show you some actual use cases, because this stuff is way more interesting when you see it in action.
Engineering Teams Setting Standards
A company I know has 50 developers. Code reviews were all over the place, some people were thorough, others barely looked. New developers didn’t know what to check for.
They created a plugin with:
- A
/review-checklistcommand that generates their standard review checklist - A code-review agent that automatically checks for their specific concerns
- A pre-commit hook that runs basic quality checks
- MCP connections to their issue tracking system
Every developer installs this plugin. Now code reviews are consistent. New people know exactly what to look for. The quality bar is clear and enforced.
The best part? When they update their standards, they just push changes to the plugin. Everyone gets the updates automatically.
No more sending around emails saying “hey, we have new review guidelines, please read this 10-page document.”
Open Source Projects Helping Contributors
An open source maintainer was tired of the same questions: “How do I set this up?” “What’s the right way to use this API?” “Why isn’t this working?”
She created a plugin for her project with:
- Commands that generate correct boilerplate code
- An agent that answers questions about the library
- Examples showing common use cases
- Links to documentation through MCP
Now she includes the plugin installation in her README. New contributors install it and immediately have expert guidance available. Her support burden dropped dramatically.
Contributors love it too. Instead of searching through docs or waiting for maintainer responses, they just ask the agent.
It’s like having the maintainer pair programming with them, except it scales to hundreds of contributors.
Developers Sharing Their Superpowers
An experienced developer had a fantastic debugging workflow, specific commands, particular ways of analyzing logs, custom scripts that caught issues fast.
He packaged it all as a plugin. Junior developers on his team installed it. Suddenly they had access to debugging techniques that took him years to develop.
Their debugging got faster and more effective overnight.
What used to require him sitting with someone for an hour, walking them through his process, now happens automatically. The plugin encodes his expertise in a way that anyone can use.
Internal Tool Integration Made Easy
A company had a bunch of internal tools, custom APIs, proprietary databases, specialized services.
Every new developer spent their first week just getting access configured and learning how to use these tools.
IT created a company plugin with:
- MCP servers connecting to all internal systems
- Commands for common internal tool operations
- Agents that understand company-specific data formats
- Hooks that automatically log activities to compliance systems
New developers install one plugin on day one and immediately have access to everything, properly configured. What took a week now takes five minutes.
Framework-Specific Helpers
A React Native team lead got tired of explaining the same patterns over and over. How to structure components, how to handle navigation, how to manage state properly.
She built a plugin with:
- Commands for generating components that follow team conventions
- An agent that reviews React Native code for common mistakes
- Templates for different component types they use
- Connections to their component library documentation
Junior developers stop making the same mistakes because the plugin guides them toward correct patterns automatically.
The team lead can focus on architecture instead of fixing basic issues.
Your Turn: What Should You Build?
Stop and think for a minute.
What annoys you about your daily workflow?
What do you explain to every new team member?
What did you spend hours perfecting in your setup?
That’s your first plugin right there.
Maybe it’s a command for generating API endpoints that follow your team’s exact structure. Maybe it’s an agent that understands your company’s coding standards and reviews PRs accordingly.
Maybe it’s hooks that run your specific testing workflow automatically. Maybe it’s MCP connections to tools only your organization uses.
Start small. Build one thing that solves one real annoyance. Don’t try to create the perfect, comprehensive plugin that does everything. Just solve one problem well.
Get that working. Share it with one person. Watch them use it. Get their feedback. Fix what’s broken. Add what’s missing.
Then expand. Add another command. Create an agent. Connect an MCP server. Add some hooks. Each addition makes your plugin more useful.
Before you know it, you’ve built something genuinely valuable that makes everyone’s life easier.
And here’s the secret, your plugin doesn’t need to be revolutionary or groundbreaking. It just needs to solve a real problem that real people actually have.
The best plugins I’ve seen are often the simplest ones. A command that generates boilerplate correctly. An agent that explains an unfamiliar codebase.
A hook that catches common mistakes before they become bugs. Simple, focused, useful.
Getting Started Right Now
Don’t just read about this. Actually do it. Here’s your plan…
In the next 10 minutes: Install Anthropic’s marketplace. Browse their example plugins. Install the PR Review plugin or whichever one seems most relevant to your work.
This week: Actually use that plugin. Don’t just install it and forget about it. Use it multiple times. See how it changes your workflow. Notice what works well and what doesn’t.
This month: Create your own plugin. Just one simple command to start. Something you do regularly that you’re tired of typing out. Get it working locally. Make sure it actually helps.
Next month: Publish it to GitHub. Share it with one friend or teammate. Get their honest feedback. Find out what’s confusing, what’s helpful, what’s missing.
This quarter: Expand your plugin based on that feedback. Add another command or an agent. Get more people using it. Iterate based on real usage.
The tools are free. The barriers are low. The potential impact is real.
Here’s what actually matters though: the plugin ecosystem grows when people participate. Your contribution is valuable even if it seems small to you.
That simple command you create might save someone hours every week. That agent you build might solve a problem dozens of people face.
And you don’t need permission to start. You don’t need to be an expert. You don’t need approval from anyone. Just create something useful and share it.
The community needs more plugins. Your team needs the tool you’re going to build. Someone out there has the exact problem you’re solving.
So go build it. Share it. Help someone. Make the ecosystem better.
Your first plugin starts with a folder, two JSON files, and one markdown file. That’s it. Everything else builds from there.
What are you going to create? Let me know in the comments.
Read More: